|
|
|
At the conclusion of the sales process, you select the payment methods used by the customer.
Use the Select Payment Method window to:
Payment for the sale can be split between payment methods.
The Sales Entry window is displayed with stock items the customer is purchasing.
.gif)
Tip: You can also press F12 to accept payment.
The Select Payment Method window is displayed. A photo is displayed if a customer has been selected from the community database and their photo is available.
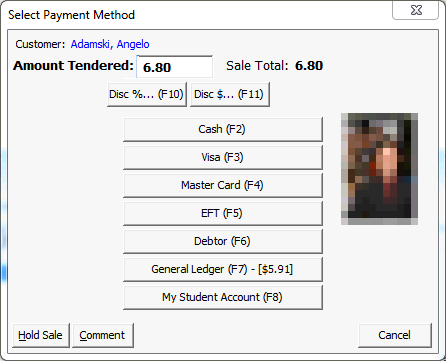
Note: You can leave the Amount to Pay the same as Sale Total if the payment is allocated to one payment method only. The Change Required window is displayed if more cash than required is given to you and you entered that amount in the Amount to Pay field.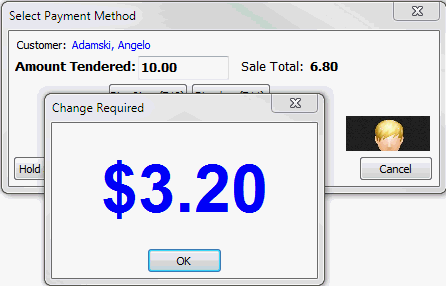
Tip: Use the function keys once you get familiar with the Select Payment Method window.
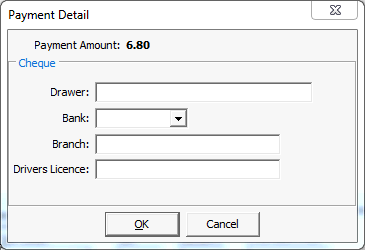
The Payment Detail window may be displayed, such as when entering cheque details.
Either the:
.gif)
Note: Split payments are supported between cash, cheque, credit card and debtor accounts. You cannot split general ledger payments. The example shown above does not correspond to the example used in the previous steps.
The docket is printed using the docket printer or a Crystal report is displayed, depending on your organisation's sales configuration.
.gif)
Note: When the sales are closed off, any debtor charges are made to the debtor account for the full amount of the sale and then receipt records are generated for the portion already paid. For example, if a $55 purchase is paid for with $25 cash and $30 charged to the debtor account, then the debtor account would receive a charge for $55 and a receipt for -$25 (which is allocated against the charge) thereby leaving $30 still owing on the charge. The example shown above does not correspond to the example used in the previous steps.
Also, each sale that contains a debtor split is raised as a separate charge. For example, four split sales would result in four charges posted to the debtor's account.
Select Payment Method window - key fields and buttons
Fields
Field |
Description |
|---|---|
Amount to Pay |
Amount to pay for the selected payment method. Defaults to the Sale Total field. You only need to alter this if you are splitting between different payment methods or if you need change calculated. Note: The Change Required window is displayed if more cash than required is given to you and you entered that amount in the Amount to Pay field. |
Buttons
Note: The buttons that appear in the Select Payment Method window are defined in the Finance Configuration Maintenance window. See Synergetic Financial Configuration - Business Units - Sale Payments sub-tab in the Finance manual for more information about setting up and configuring payment methods.
Button |
Description |
|---|---|
|
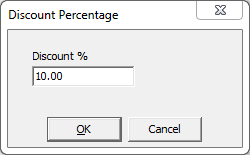
Apply a discount, expressed as a percentage off the entire sale amount.
|
|
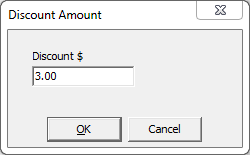
Apply a discount, expressed as a dollar amount off the entire sale amount.
|
|
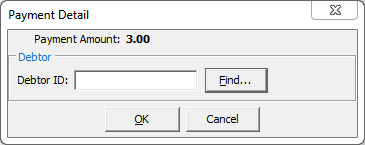
Use the Payment Detail window to find the debtor to allocate the sale to.
Note: If you are selling to a student, the debtor details are displayed for you. Either:
|
|
Use the Payment Detail window to allocate charges to the general ledger account and sub-allocation code. Use this for internal sales at your organisation where only a general ledger transfer takes place.
Note: The net amount is displayed for general ledger transfers, as they do not incur any taxes because they are internal to your organisation.
Note: The button listed here is an example only. The button options, labels and shortcut keys depend on your organisation's configuration. |
|
Accept cash payment for the sales.
Note: The button listed here is an example only. The button options, labels and shortcut keys depend on your organisation's configuration. |
|
For credit card payments, click either the:
The way credit cards are configured on the Select Payment window is set on the Sale Payments sub-tab in Finance Configuration Maintenance. See Synergetic Financial Configuration - Business Units - Sale Payments sub-tab in the Finance manual. Note: The button listed here is an example only. The button options, labels and shortcut keys depend on your organisation's configuration. |
|
Use the Payment Detail window to enter information about the cheque.
|
|
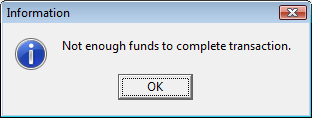
Accept payment through the My Student Account payment system, if used by your organisation. The following dialog is displayed if there are insufficient funds available for the customer:
Note: You can configure the My Student Account options. See Maintaining sales setup data in the Finance manual. |
|
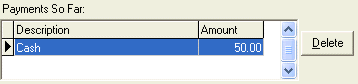
Delete the highlighted payment made so far, if the customer changes their mind about the payment method or the quantity being applied.
Note: The Delete button only appears when payment methods have been selected.
Note: The button listed here is an example only. The button options, labels and shortcut keys depend on your organisation's configuration. |
|
Hold the sale temporarily. For example, if a customer has to go to their car to get more cash. This allows you to continue processing other sales. |
|
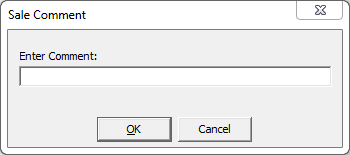
Add comments to the payment methods of the sale. It is suggested that for:
The following window is displayed.
Click Note: The text on the button is displayed in bold if there is an existing comment. Click |
|
Cancel the payment methods selected and return to the Sales Entry window. |
Last modified: 7/03/2013 2:29:28 PM
|
See Also |
© 2013 Synergetic Management Systems. Published 15 October 2013.

.gif)
.gif)