Previous icon

Next icon

Processing other (non-debtor) cheques

As well as cheques from debtors, your organisation will also receive cheques that are not from a debtor to pay off their account. For example, you may receive cheques for government funding, payments of fines or payments for hire of facilities.

This procedure explains how to enter details of non-debtor cheques received by your organisation.

For other situations, see:

  1. Select Module > Debtors > Cash Receipts Entry from the main menu.

    The Select Cash Receipts to Process window is displayed.

  2. Click New Cash Receipts Posting.

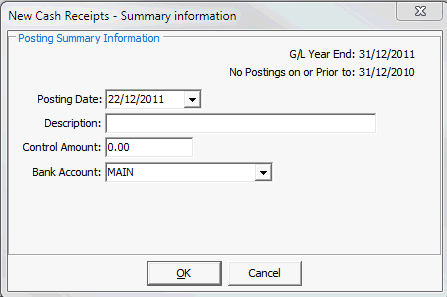
    The New Cash Receipts - Posting Summary information window is displayed.

    New Cash Receipts - Summary Information window

  3. Select today's date in the Posting Date field.
  4. If required, enter a meaningful description of the receipts, for example Cheque - Facilities Hire.
  5. The Control Amount is optional. If you enter a control amount, the total of all the cheques you enter must add up to the amount in this field.
  6. Select the bank account the cheques will be banked into, usually MAIN.
  7. Click OK button.

    The Payment Detail tab of the Debtor Cash Receipts Entry window is displayed. See Debtor Cash Receipts Entry - Payment Detail tab.

    Debtor Cash Receipts Entry - Payment Detail tab (cut down)

  8. Select Community to search for the community member displayed in the Drawer field.
  9. Click Search button.
  10. Locate the community member.
  11. Select a payment type of Cheque.
  12. Select the Bank.
  13. Type in the BSB number in the Branch field.
  14. Type in the amount of the cheque in the Amount field.
  15. Type in the Bank Statement Reference, BSB and Account fields if required by your organisation's policies.
  16. Select the G/L Allocations tab.

    Tip: Press Alt + N twice to jump to this tab.

    The total amount of the cheque and any amount already allocated are displayed.

    Debtor Cash Receipts Entry - G/L Allocations tab (cut down)

  17. Enter the G/L Code for the payment.

    The amount not allocated to an account is displayed in the Amount field.

  18. Enter the amount to allocate in the Amount field.
  19. Select a Tax Code.
  20. Enter a Description.

    Tip: Press Alt + C or click Copy Drawer button to copy the name of the drawer from the Payment Detail tab into the Description field.

  21. Click OK button.

    The amount outstanding is allocated to the selected G/L code.

Last modified: 23/09/2014 4:17:54 PM

See Also

Processing cheques

Processing cheques from debtors

Processing voluntary contributions

© 2015 Synergetic Management Systems. Published 6 May 2015.

Top of page