Stocktaking using a representative item
You can use representative items to enter a stocktake. That is:
- Scan an item on the shelf or enter its item code. This is the representative item.
- Count how many there are, including the one that was just scanned.
- Enter the count using the Item Stocktake window. See Using the Item Stocktake window.
Alternatively, for some items it is easier to use the Increment Count by 1 mode. See Stocktaking using the barcode of individual items.
One method of performing the stocktake is for:
- one person to use a wireless barcode scanner to scan the stock item and count the stock
- another person to enter the count called out by the first person.
Another method is use a laptop with a:
- wireless connection to your network
- barcode scanner attached to the laptop.
To record the stocktake by using representative items:
- Select Module > Sales > Item Stocktake.
If there are no open stocktakes, the Create New Stocktake window is displayed. Otherwise, the Item Stocktake window is displayed - skip to step 7.
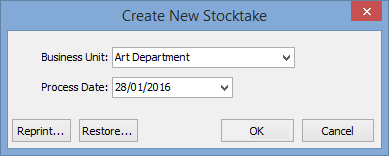
- Select the Business Unit to perform the stocktake for, if it is different to that displayed.
- Change the Process Date if the effective date of the stocktake is different to today's date.
Note: You can reprint an existing Item Stocktake report at this stage. See Reprinting Item Stocktake reports.
- Click
 .
.The following dialog is displayed.
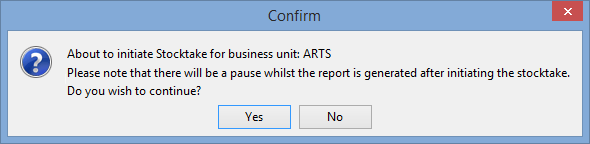
- Click
 .
.The Item Stocktake report is displayed.
.gif)
- Click
.gif) to close the Item Stocktake report window.
to close the Item Stocktake report window.The Item Stocktake window is displayed.
- Select the Go to Item for manual stock entry mode, if not already selected.
.gif)
- Either:
- Scan the barcode of a representative stock item. For example, if you have several reams of A4 paper scan the barcode on one of the reams.
- Enter the item code of a representative stock item in the Locate field and click
.gif) .
.
The cursor is positioned in the Count field of the item.
.gif)
- Physically count the number of the selected stock item.
- Type the stock count value.
- Press Enter or select the Locate field.
The stock count is recorded and the Item Stocktake window is prepared for the next item to be scanned or entered.
.gif)
- Repeat steps 8 through 10 for each item.
.gif)
- Depending on your organisation's stocktaking policy, recount any items where the count is different to the Stock On Hand field. That is, where the Adjust value for an item is not zero.
Note: Stock adjustments are not created until the stocktake is closed off.
- Click
 when the stocktake is complete.
The following dialog window is displayed.

- Click .
The Item Stocktake report is printed to your default printer and the following message is displayed.
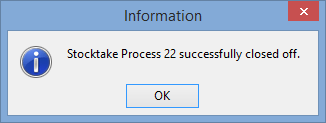
- Click .
The Item Stocktake window is closed.
- Create any adjustment G/L journals you require. See Entering general ledger journals in the General ledger manual.
For example, depending on how your organisation manages inventory you can:
- create a G/L journal from the stock control (balance sheet) account to the stock movement (profit and loss) account
- optionally also do a secondary G/L journal to a stock write off account.
Last modified: 9/06/2016 12:46:08 PM
© 2016 Synergetic Management Systems. Published 16 September 2016.


