

|
|
|
You can configure the Community Portal to display:
Configuring the Community Portal to display specific year levels
To configure which year levels display on the portal:
The Lookup Table Maintenance window is displayed.
.gif)
Configuring different settings for parents or students
You can configure the Community Portal to use different settings for students. Any community member who is not a student always sees the base configuration - that is, the configuration setting with a blank Key 5 field.
Tip: You can use the following procedure to customise most aspects of the Community Portal for students. For example, to display topic comments only to students or display different custom HTML at the top of the Timetable tab. Just substitute the configuration setting you want to customise for the EnabledKey setting in step 6.
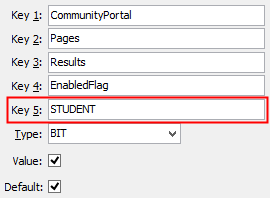
To configure the Community Portal to display or hide tabs for students:
The Lookup Table Maintenance window is displayed.
.gif)
Note: Students in year levels or year level groups without an override key are shown the same tabs their parents would see.
The Configuration File Maintenance window is displayed.
A duplicate of the configuration setting is made.
Note: If you use multiple override keys, any student in a year level where the override key is not configured is shown the same configuration their parents would see.
The portal is configured.
Configuring different settings for students of different year levels
You can customise the Community Portal to display different tabs and information for students of different year levels. This customisation does not affect anyone who is not a student. Parents and other non-student community members are shown the base configuration setting - that is, the configuration setting with a blank Key 5 field.
Tip: You can use the following procedure to customise most aspects of the portal on a per-year-level basis. For example, to display topic comments only to senior students, or change the customHTML at the top of the Timetable tab for Primary students. Just substitute the configuration setting you want to customise for the EnabledKey setting in step 6.
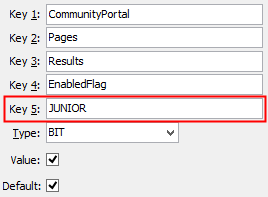
To configure the portal to display different tabs for students of different year levels:
The Lookup Table Maintenance window is displayed.
.gif)
Note: Each year level can have only one override key. We recommend creating year level groups, as in the above example, rather than individual override keys for each year level, as it is much easier to manage a small number of override keys.
The Configuration File Maintenance window is displayed.
A duplicate of the configuration setting is made.
Note: If the configuration setting already uses all five keys, add the year level identifier to the Key 5 value after a pipe '|' symbol. For example: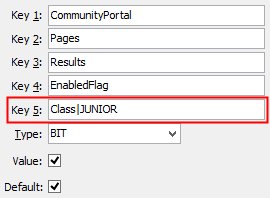
Note: Any year levels or year level groups not specifically configured this way follow the default configuration setting. That is, the configuration setting with a blank Key 5 field.
The Community Portal is configured.
Last modified: 26/07/2016 2:38:08 PM
|
See Also |
|
|
|
© 2017 Synergetic Management Systems. Published 19 July 2017. |
