Previous icon

Next icon

Customising the CSS and images

The appearance of the Community Portal is controlled by HTML and CSS files. By creating override files, you can customise the Community Portal's:

Customising the colour scheme, typefaces and font size

To customise the Community Portal's colour scheme, typefaces and font size:

  1. Open Windows Explorer on the web server.
  2. Go to Inetpub\wwwroot\SynergeticCommunityPortal\Site.
  3. Create a Css sub-folder.

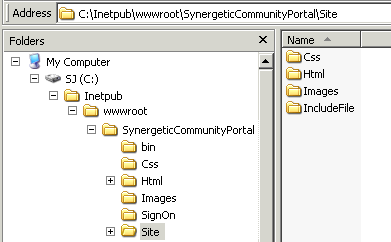
    Note: The subfolders that can be created under the "[Portal]\Site" folder are Css, Html, Images and IncludeFile.

  4. Go to Inetpub\wwwroot\SynergeticCommunityPortal\Site\Css.

    Community Portal - Custom HTML file location

  5. Create a new text file named site.css.

    Note: The file must be named site.css or the customisations will not appear. All custom CSS must be placed in site.css. Any customisation to the portal.css file is lost during upgrades.

  6. Open site.css using Notepad or WordPad.
  7. Type the CSS you wish to customise.

    Note: You can view the portal's CSS classes in Inetput\wwwroot\SynergeticCommunityPortal\Css\portal.css. Make sure you only make changes within your site.css file, not the portal.css file.

  8. If you have copied sections of the portal's current CSS as a template, remove any sections of the CSS that you haven't changed.
  9. Save and close the file.
  10. Load the Community Portal in a web browser to test your changes.

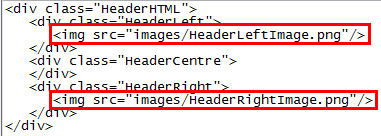
Customising the header images

To customise the Community Portal's header images:

  1. Open Windows Explorer on the web server.
  2. Go to Inetpub\wwwroot\SynergeticCommunityPortal\Site.
  3. Create Images and Html sub-folders.
  4. Go to Inetpub/wwwroot/SynergeticCommunityPortal/Site/Html.
  5. Copy Inetpub/wwwroot/SynergeticCommunityPortal\Html\hdr1.html in to the new folder Inetpub/wwwroot/SynergeticCommunityPortal\site\html\hdr1.html.
  6. Copy your two new header images into Inetpub/wwwroot/SynergeticCommunityPortal\site\images.

    Community Portal - Custom Header HTML file location

  7. Open hdr1.html in Notepad or WordPad.
  8. Edit the HTML to display your header images.

    Community Portal - Custom Header HTML file text

  9. Load the Community Portal in a web browser to test your changes.

Replacing the header image with a user form

You can use a user form in place of your header image, allowing you to create and customise the header with C# programming. To replace the header image with a user form:

  1. Open Windows Explorer on the web server.
  2. Go to Inetpub/wwwroot/SynergeticCommunityPortal/Site/userform.

    Windows Explorer - SynergeticCommunityPortal - Site - Userform folder

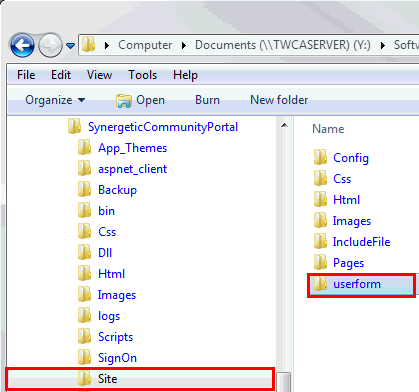
    Note: Create the folder if it does not already exist.

  3. Save the user form you want to use as a header in this folder as CommunityPortalHeader.ascx.

    The header is replaced.

Last modified: 20/09/2016 1:17:21 PM

See Also

Using CustomHTML

AcrobatDetectHTML configuration setting

StudentContact:ChangedIndicator configuration setting

SchoolAdmin:ChangedIndicator configuration setting

Using Include files

Embedding Crystal Reports in CustomHTML

© 2016 Synergetic Management Systems. Published 20 September 2016.

Top of page