Previous icon

Next icon

Using the Task window

Use the User/Workflow Task window to:

How to:

Opening the User/Workflow Task window

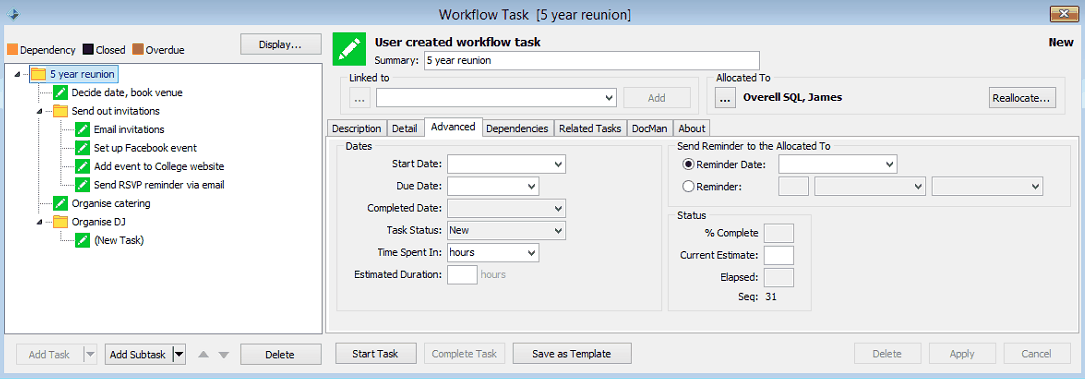
Task window key fields and buttons

Task Details Fields

Field

Description

Summary

Brief task description.

Linked to

Select a maintenance module such as Creditor Maintenance from the drop-down menu to link the task to a maintenance record. Click Launch button to view the selected maintenance record.

Linked tasks (Workflow task window)

Note: The title of the field changes depending on the maintenance area linked to the record.

Updated name (Linked to Tasks field)

Note: The maintenance modules displayed will depend on your security permissions. Contact your IT administrator.

Allocated To

Community member allocated to the task. Click Launch button to launch Community Maintenance.

Note: This defaults to the community member who created the task. Use the Reallocate button button to allocate a different community member.

Task Details (Advanced) area buttons

Button

Description

Display button (Workflow Tasks)

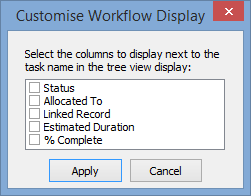
Launch the Customise Workflow Display window to display additional information next to task names in the tree view.

Customise Workflow Display window

Task example (Customise Workflow Display)

Launch button (Linked to Tasks)

Launch the linked maintenance area (e.g. Creditor Maintenance) record.

Launch button (Allocated To)

Launch Community Maintenance to view the person allocated to the task.

See Maintaining community members in the Community manual.

Note: Click Reallocate button to select a different community member.

Add button (workflow tasks)

Remove button (Task window)

Launch the search criteria window of the selected maintenance module to link a record to the task.

Once a record is linked to the task, the Add button (workflow tasks) button changes to Remove button (Task window) to allow you to remove the link from the task record.

Reallocate button

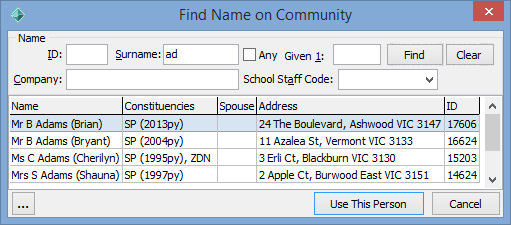
Launch the Find Name on Community window to reallocate the task to a different community member.

Find Name on Community window.gif

Tip: Select the School Staff Code to quickly allocate the task to another staff member.

Add task button (workflow tasks)

Select either:

  • Add Task to insert a blank task underneath the selected task.
  • Add Task from Template to launch the Select a Template for New Task window to either:
    • add a task from a template
    • add a new task without using a template.

Add subtask button (workflow tasks)


Select either:

  • Add Subtask to insert a blank sub-task under the selected task.

    Note: If this is the first sub-task for the selected task the icon changes to indicate that it is now a parent task:

    Sub-task created (cut-down)

  • Add Subtask from Template to launch the Select a Template for New Task window to either:
    • add a sub-task from a template
    • add a sub-task without using a template.


Note: When a sub-task is added the User Task window becomes the Workflow Task window.

Navigation arrows (workflow tasks)

Move the selected task up or down the task tree.

Start button (workflow tasks)

Start the selected task.

On the Advanced tab:

  • the Start Date is set to the current date and time
  • the Task Status field is set to In Process.

Complete button (workflow tasks)

Complete the selected task. The task description turns green to indicate that the task has been closed.

Completed task (Workflow Task window)

On the Advanced tab:

  • the Completed Date is set to the current date and time
  • the Task Status field is set to Closed.

Save Task As Template button (workflow tasks)

Save the selected task as a template. See Using task templates.

Delete button (User-Workflow task window)

Delete the selected task.

Apply button (Workflow tasks window)

Save changes to the task and continue editing.

Cancel button

Cancel changes to the task and close the current window.

Last modified: 8/04/2015 11:56:28 AM

See Also

Managing tasks

Creating a new task

Creating a linked task

User/Workflow Task - Description tab

User/Workflow Task - Detail tab

User/Workflow Task - Advanced tab

User/Workflow Task - Dependencies tab

User/Workflow Task - Related tasks

User/Workflow Task - DocMan tab

User/Workflow task - About tab

Using task templates

Creating a new task

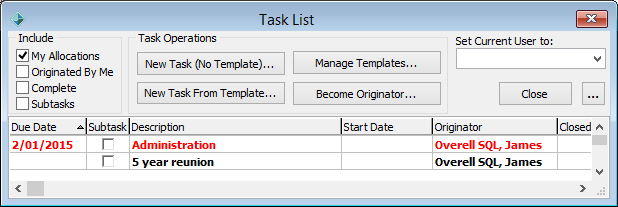
To create a new task:

  1. Click New Task (No Template)... button (ellipses).

    The User Task window is displayed.

    User Task - Description tab (new task)

    Tip: You can also create new tasks from existing templates. See Creating a task from a template.

  2. Type a description in the Summary field and add any further instructions in the Description tab.
  3. Link a maintenance module to the task using the Linked to Tasks drop-down, if required.
  4. Click Reallocate button to reallocate the task to a different staff member, if required.

    Note: Tasks are allocated to the creator of the task by default.

  5. Click the Advanced tab to add information relating to:
  6. Click Add subtask button (workflow tasks) to create a sub-task, if required.

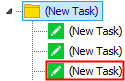
    The Workflow Task window is displayed with a parent task Parent task and sub-task.

    Workflow task window (inital)

    Note: When a sub-task is added the User Task window becomes the Workflow Task window.

  7. Click Add task button (workflow tasks) to create additional tasks under the parent task.
  8. Click Add subtask button (workflow tasks) to either create additional sub-tasks. Either:

    Task underneath a parent task

    New sub-task created underneath task (User-Workflow window)

    Tip: You can also add tasks and sub-tasks from templates. See Adding a template to an existing task.

  9. Repeat steps 7 through 8 to add additional tasks.
  10. Click Start button (workflow tasks).

Last modified: 8/04/2015 11:56:29 AM

© 2015 Synergetic Management Systems. Published 6 May 2015.

Top of page