

|
|
|
You can customise your Crystal Reports by:
Adding an underlay file
A PDF underlay file is a prepared PDF file that is printed 'underneath' the Crystal Report. For example, a watermark of your organisation's logo or additional terms and conditions. All Crystal Reports from the same sub ledger use the specified underlay file.
Note: Underlay files must not be longer than one page. If the underlay file is more than one page, the pages are overlaid on top of each other, and push the actual report information to the next page. If you have more than one page of information to display, we recommend you provide a web link within the underlay file to the additional files so they can be downloaded by the recipient.
To add a PDF underlay file to a Crystal Report:
Note: The Crystal Report is laid directly on top of the underlay file. If you want to display text in your underlay file, such as additional terms and conditions, make sure they are displayed on an area that the report does not print to.
The General tab of Synergetic Financial Configuration is displayed.
The Underlay sub-sub-tab is displayed for the selected sub ledger.
.gif)
Note: All reports for this sub ledger use the specified underlay file.
Note: You can also apply underlays which are headers or footers as well as the Normal underlay file. The header page occurs before the main document and the footer file occurs after the main document. The Normal underlay file is merged with the statement.
Tip: Header and footer PDFs must be saved in the same directory as the Normal underlay PDF, with _Header or _Footer appended to the filename. For example, the if the normal file is \\Server\Synergetic\Reports\Site\Letterhead.pdf, the header file is \\Server\Synergetic\Reports\Site\Letterhead_Header.pdf.
Tip: If you do not want to apply an underlay, select Do Not Apply.
The underlay file is added for the selected statements or invoices.
Customising the report style
The Crystal Report stationery code is displayed at the top of each statement window. It tells you which report Synergetic is using for printing statements.
![]()
You can customise the standard statement report style to suit your stationery, using Crystal Reports. This is saved in the site directory within the Synergetic reports folder on your server.
Note: The default statement is DebSt but there are several other variations in the reports directory that you can base your customised version on.
To specify the new report name to use for printing statements:
The Debtors (Page 3) tab of the Synergetic Financial Configuration window is displayed.
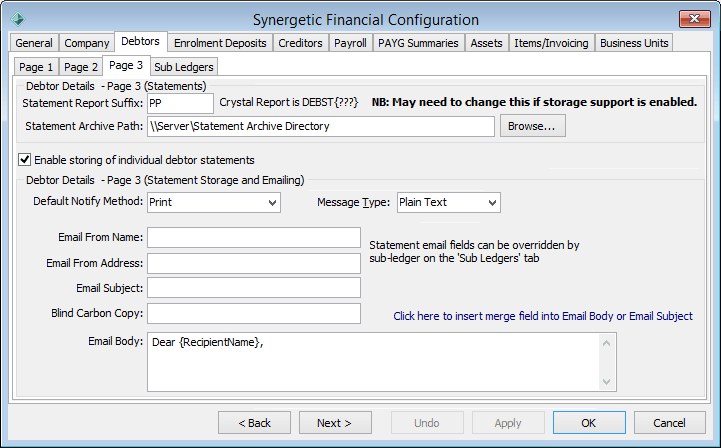
Note: In the example, the suffix PP is used to represent report DebStPP (where DebSt is the standard report)..gif)
Last modified: 15/09/2016 5:21:50 PM
© 2017 Synergetic Management Systems. Published 20 July 2017.
