|
|
|
The Short Message Service (SMS) allows text messages to be sent and received by mobile devices. Synergetic generates an email that is sent to an email to SMS gateway which converts it to an SMS text message.
You can send SMS text messages from any of the windows within Synergetic that includes a grid that displays community members. For example, you can send an SMS from the Relations tab.
To send SMS text messages:
In this example, we have navigated to the Relations tab in Community Maintenance.
.gif)
The menu is displayed for the grid.
.gif)
The Send SMS(s) window is displayed.
.gif)
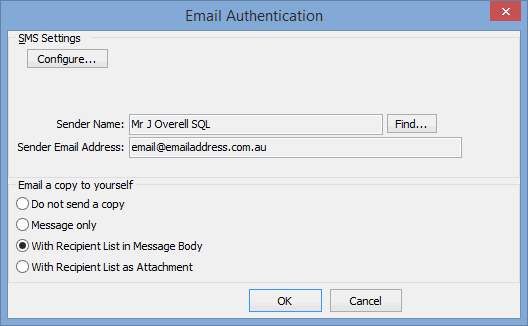
The Email Authentication window is displayed.
The following dialog window is displayed.
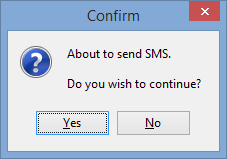
The SMS is sent to the recipients via the servers that have been configured.
Send SMS(s) window key fields and buttons
Address/Subject/Type area
Fields
Field |
Description |
|---|---|
To |
Recipients of the SMS. This is either a:
|
Classification |
Select the classification of the SMS(s):
|
ID Field to Use |
If several ID fields are available, select which Synergetic ID field to use as the recipient. For example, if emailing from the Relations tab of Current Student Maintenance, you can select to email either the student or their relations. Note: This field is only displayed if there are multiple fields from which IDs could be selected. |
Enable field merging |
Select to display the Merge fields area. Double click a merge field to add it at the cursor's current position. Synergetic will populate the SMS with data at the time of sending the email. |
Send to parents |
Select to send the email to the parents or guardians of the listed recipients. See Sending emails from a grid. Note: When this field is selected the parent records will be marked with a "+" in the Merge fields area. Activation of this field is managed using the Email: ShowSendToParentFlag configuration setting. See Email: ShowSendToParentsFlag configuration setting. Note: When parents with multiple students are sent an email without merge fields (see below) they will only receive a single email. |
Select signature |
Select a signature to insert into the SMS. To add, edit or delete signatures. See Maintaining email signatures. |
Use template |
Select a template to use for the SMS. To add, edit or delete templates. See Maintaining email templates. |
Message |
Text message to be sent to the recipient or recipients. Tip: Right click the message area to cut, copy or paste text. Note: Some mail servers automatically append disclaimers or policies on outbound emails, including SMSes. To prevent this, set the terminator in the SMS Configuration. See Using the Email / SMS Configuration window in the System maintenance manual. |
Truncate SMS at XXX chars |
Select to limit the length of the SMS message to the number of characters specified. See SMS:CharacterCount configuration setting in the System maintenance manual. |
SMS Count |
Number of characters that can be entered in the Message field before a SMS message is created. The number of SMS messages is shown in parentheses. Note: This count is an estimate only. Merge field substitutions will affect the actual character count for the SMS.
|
Buttons
Button |
Description |
|---|---|
|
Edit the people who will receive the SMS. If there are multiple recipients, you can:
Tip: Select Hide Empty Mobile Phone Number(s) to only show people who have a mobile phone set up. See the field descriptions below.
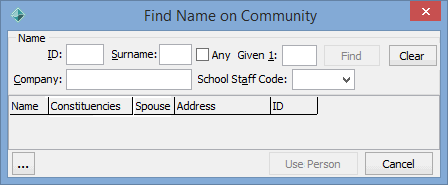
Note: If you are sending an SMS to one person only, the Find Name on Community window is displayed. Search for the community member you want to SMS and click |
|
Add, edit or delete email signatures. See Maintaining email signatures. |
|
Add, edit or delete email templates. See Maintaining email templates. |
|
Send the SMS to the recipients. |
Recipient List window key fields and buttons
.gif)
Tip: Click on a column heading to sort records in ascending order. Click again to reverse the sort order.
Fields
Field |
Description |
|---|---|
Hide Empty Mobile Phone Number(s) |
Select to hide names that do not have a mobile phone number set up. In the example used above, Mr Cane no longer appears when this field is selected.
|
Grid area fields
Field |
Description |
|---|---|
ID |
Synergetic ID of the community member. |
Mobile |
Name of the community member and their mobile phone number, if it is available. Synergetic uses the community member's default mobile phone unless contacting parents of students or future students, which may have been explicitly set to use the occupation or home phone numbers. In the following example, the Default Mobile Phone is Personal so the Mobile field on the Phone tab is used.
In the following example, the Default Mobile Phone is Occupation so the Mobile field on the Occupation tab is used.
See:
|
Buttons
Button |
Description |
|---|---|
|
Add one or more community members to the list of recipients. To add one or more community members:
|
|
Add a parent of the selected student entry to the recipient list. To add a parent:
|
|
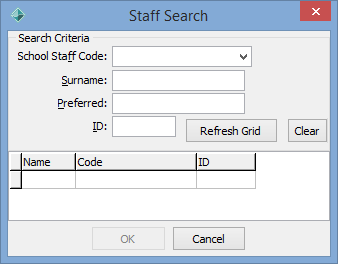
Add one or more staff members to the list of recipients. To add one or more staff members:
|
|
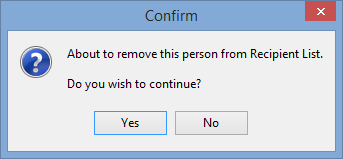
Delete the person from the recipient list. The following dialog is displayed.
Click |
|
Close the window. The selected recipients are used. |
Last modified: 20/12/2016 2:31:45 PM
|
See Also Communicating with community members Configuring automatic notifications |
© 2017 Synergetic Management Systems. Published 20 July 2017.

.gif)
.gif)
.gif)
.gif)